Craving cake but short on time? Our microwave cake recipes deliver celebratory sweets in minutes. Each dessert cooks in under 2 minutes, making spontaneous parties a breeze.
From colorful funfetti to elegant graduation treats, these recipes turn your microwave into a mini bakery. No oven needed for these festive, fast, and fabulous cakes.
We’ll show you how to whip up four amazing celebration cakes plus share quick decorating tricks.
Jump To:
Sprinkle-filled Funfetti Mug Cake in Minutes
Nothing says celebration quite like rainbow sprinkles bursting through fluffy vanilla cake. Our funfetti mug cake delivers party vibes in just 90 seconds of microwave time.
From my experience, the key to perfect funfetti texture lies in the flour-to-liquid ratio. We use 3 tablespoons of all-purpose flour with 2 tablespoons of milk for that ideal moist crumb.
What I found works best is folding in the rainbow sprinkles at the very end. This prevents the colors from bleeding during cooking and keeps those cheerful pops of color intact.
The batter should look slightly lumpy – don’t overmix! I learned this the hard way when my first attempt turned into a dense hockey puck. A few gentle stirs create that tender, bakery-style texture we’re after.
Start with room temperature ingredients for even mixing. Cold butter creates lumpy streaks that won’t distribute properly in our quick cooking time.
Cook for 60 seconds first, then check the center with a toothpick. If it comes out wet, add 15-second intervals until done. Overcooking turns our celebration cake into rubber, so watch carefully.
Elegant Mini Graduation Cakes From Your Microwave
Graduation deserves sophistication, even from a microwave. These mini cakes pack elegant flavors into individual servings that cook in under 2 minutes each.
I strongly suggest using vanilla extract instead of artificial vanilla for these special treats. The real deal creates depth that artificial flavoring simply can’t match in our quick cooking method.
What I discovered through trial and error is that slightly undercooking these cakes gives the best texture. They continue cooking from residual heat after removing from the microwave.
One mistake I made early on was using too much baking powder. These small cakes need just a pinch – about 1/4 teaspoon – or they’ll overflow your mug during cooking.

The secret to elegant presentation lies in the cooling process. Let each cake rest for 2 full minutes before attempting to remove from the mug. This prevents cracking and ensures clean edges.
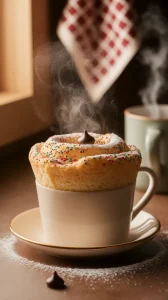
From my own experience, dusting with powdered sugar creates an instant sophisticated look. A simple sieve works perfectly for even distribution across the cake surface.
Graduation Cap Brownie Mug Cake Creation
Transform rich chocolate brownies into adorable graduation caps with this clever microwave technique. Each brownie cooks in 75 seconds and shapes perfectly for cap decorating.
The brownie base needs serious chocolate flavor to compete with traditional baked versions. We use both cocoa powder and mini chocolate chips for double chocolate intensity that doesn’t disappoint.
What I found works best is slightly underbaking these brownies compared to regular mug cakes. They should still look slightly wet in the center when done – this creates that fudgy texture graduates will remember.
One trick I learned is pressing the brownie flat immediately after cooking. Use the back of a spoon to create that perfect graduation cap square shape while it’s still warm and moldable.

The “tassel” comes from yellow string cheese or melted yellow candy. I prefer string cheese because it holds its shape better and adds a fun textural contrast to the rich brownie.
From my experience, these brownies taste even better after cooling for 5 minutes. The chocolate flavors meld together, creating that bakery-quality depth we’re craving for such a special occasion.
Also See: Cheap Microwave Ramen With Canned Spinach
Copycat Starbucks Cake Pop Microwave Shortcut
Recreating those iconic Starbucks cake pops at home seemed impossible until we cracked the microwave code. Our shortcut delivers authentic cake pop flavor in just 2 minutes without the fancy equipment.
From my own experience, the secret lies in the cake-to-frosting ratio. Traditional cake pops use one part frosting to three parts cake crumbs, but our microwave version needs slightly more moisture to bind properly.
What I found works best is letting the cooked cake cool completely before crumbling. Warm cake creates soggy balls that won’t hold their shape when dipped in chocolate coating.
One mistake I made early on was rolling the balls too tightly. Gentle shaping prevents dense, heavy cake pops that taste nothing like the Starbucks originals we’re trying to replicate.

The chocolate coating makes or break these treats. We melt chocolate chips with a teaspoon of coconut oil for that smooth, glossy finish that hardens perfectly at room temperature.
I strongly suggest using cake pop sticks from the craft store rather than improvising with toothpicks. The wider surface area prevents the cake from sliding off during dipping.
What I discovered through multiple attempts is that chilling the shaped balls for 15 minutes before dipping prevents cracking. Cold cake pops also hold their shape better when the warm chocolate hits them.
Essential Tools for Microwave Baking Success
The right tools transform microwave baking from hit-or-miss to consistently delicious. We’ve tested dozens of mugs and containers to find what actually works for celebration cakes.
From my experience, ceramic mugs outperform glass or plastic every time. They distribute heat evenly and prevent those frustrating hot spots that create rubbery patches in our cakes.
What I found works best is using wide, shallow mugs rather than tall, narrow ones. The increased surface area allows for better heat circulation and more even cooking throughout the batter.
One mistake I made was using metal measuring spoons in the microwave. Always use plastic or wooden utensils for mixing and checking doneness to avoid dangerous sparking.
A good silicone spatula becomes your best friend for these recipes. The flexible edge scrapes every bit of batter from the bowl and folds ingredients gently without overmixing.
I strongly suggest investing in microwave-safe ramekins if you’re serious about celebration cakes. They create more professional-looking results than standard coffee mugs and stack beautifully for storage.
What I discovered is that parchment paper circles cut to fit the bottom of your container prevent sticking completely. This simple trick saves countless cakes from breaking apart during removal.
Paper towels become essential for quick cleanup and covering items during reheating. Keep a roll handy because microwave baking can get messy fast, especially with frosting and decorations.
Quick Decoration Ideas for Your Celebration Cakes
Transforming plain microwave cakes into celebration showstoppers doesn’t require professional pastry skills. Simple decorating techniques create impressive results in minutes, not hours.
From my own experience, powdered sugar dusting provides instant elegance with zero skill required. A fine-mesh sieve creates professional-looking snow-like coverage that screams special occasion.
What I found works best for colorful celebrations is using gel food coloring in simple buttercream. Just a tiny drop creates vibrant colors that stay true even under bright party lighting.
One mistake I made was trying complex piping techniques on warm cakes. Always let your microwave creations cool completely before adding any frosting or decorative elements.
Fresh berries instantly elevate any celebration cake from ordinary to extraordinary. Strawberry slices, blueberry clusters, or raspberry caps add natural sweetness and beautiful color contrast.
I strongly suggest keeping edible glitter and colored sprinkles in your pantry for spontaneous celebrations. These shelf-stable decorations transform basic cakes into party-worthy treats instantly.
What I discovered is that melted chocolate drizzles create bakery-quality presentation with minimal effort. Microwave chocolate chips with a teaspoon of oil for 30 seconds, then drizzle away.
Candied citrus peels add sophisticated flavor and visual appeal to graduation or anniversary cakes. The bright colors and elegant curls make any celebration feel more refined and thoughtful.
From my experience, simple buttercream roses made with a star tip look incredibly impressive but take less than 5 minutes to create. Practice on parchment paper first, then transfer to your finished cake.
Start Your Microwave Celebration Baking Adventure
We’ve shared four fantastic microwave cake recipes that transform ordinary moments into sweet celebrations. Each recipe takes less than 5 minutes to prepare and cook, making them perfect for spontaneous birthday surprises or when you need a festive treat without the fuss of traditional baking.
The beauty of microwave celebration cakes lies in their flexibility and speed. You can whip up a Funfetti mug cake for a Tuesday pick-me-up or create elegant mini graduation cakes when company arrives unexpectedly. Start with one recipe that catches your eye and experiment with different toppings and decorations to make each celebration uniquely yours.