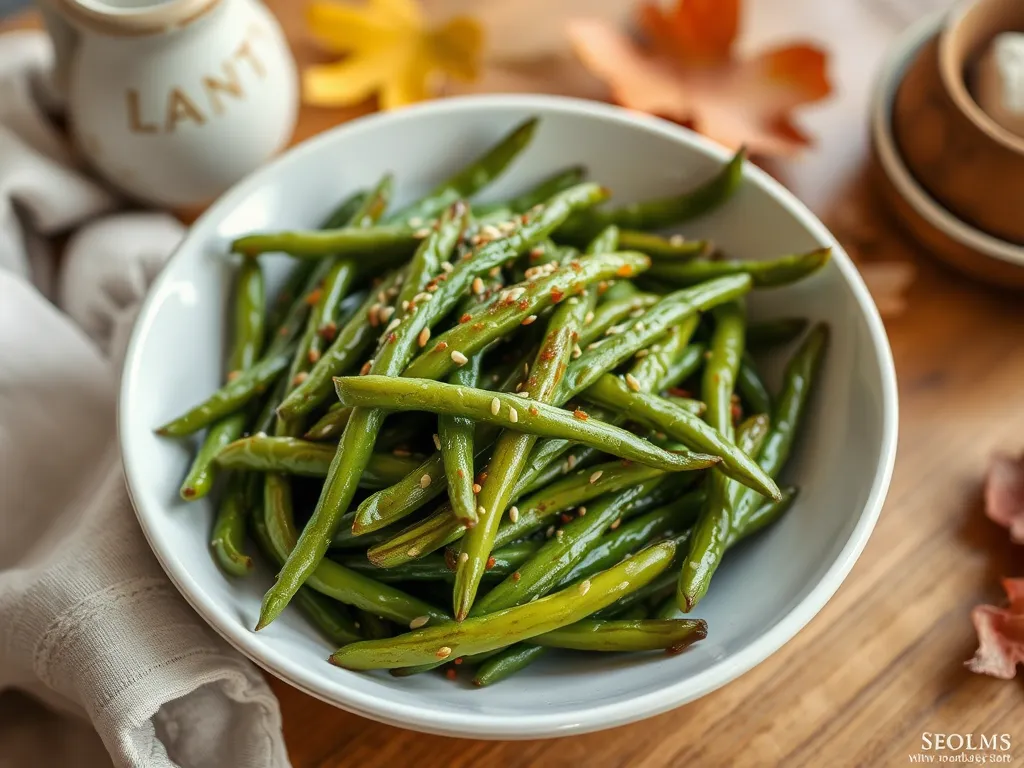
Craving crisp-tender green beans with a sticky-sweet glaze but short on time? We’ve got your back. Our microwave method skips the stovetop chaos and delivers perfectly glazed beans in under 8 minutes—no saute pans or sticky counters required.
This isn’t just “nuked veggies.” The microwave locks in crunch while caramelizing a balsamic glaze with a kiss of tanginess. Seriously, even your oven will be jealous.
Below, we’ll break down how to nail this dish—from prepping beans to balancing that glossy glaze—without turning them into mushy casualties.

Jump To:
Glazed Green Beans (Microwave Balsamic Finish)
Course: Side DishCuisine: American4
5
minutes5
minutes90
kcal10
minutesSay goodbye to long cooking times! With this microwave recipe, you can enjoy delicious glazed green beans in just minutes. A tangy balsamic glaze enhances the natural sweetness of the green beans, making them a perfect complement to any meal. This easy-to-follow recipe is ideal for beginners and will have you serving up a healthy and flavorful side dish in no time.
Ingredients
fresh green beans
trimmed
balsamic vinegar
olive oil
honey or maple syrup
salt and pepper to taste
garlic
seeds for garnish . optional
Directions
- Place trimmed green beans in a microwave-safe dish, Add balsamic vinegar, olive oil, honey (or maple syrup), and minced garlic if using, Toss to coat the green beans evenly, Cover the dish with a microwave-safe lid or plate, Microwave on high for 4-5 minutes, checking for doneness halfway through, Carefully remove the dish from the microwave, season with salt and pepper to taste, and toss again to combine, If desired, sprinkle with sesame seeds before serving..
Notes
- Feel free to adjust the level of sweetness by adding more honey or maple syrup. If you prefer a stronger garlic flavor, you can add more minced garlic. This recipe is also easily customizable; consider adding toasted almonds or a squeeze of lemon juice for extra flavor. Serve these glazed green beans alongside your favorite protein for a well-rounded meal!
What is Microwave Balsamic Glaze?
Microwave balsamic glaze is our cheat code for transforming basic green beans into a sweet-tangy side dish. It’s a reduction of balsamic vinegar, sweetener (like honey or maple syrup), and aromatics—thickened in minutes using microwave power instead of tedious stovetop simmering. The intense heat rapidly caramelizes sugars while preserving the vinegar’s fruity sharpness.
My brother Joseph once attempted a stovetop version for a family picnic, but ended up with a pan of limp beans and burnt glaze. My mom Linda, ever the microwave maestro, salvaged the dish by steaming fresh beans and reducing the glaze in 90 seconds flat. The result? Crisp beans with a glossy finish that vanished before the potato salad.
Why Use a Microwave for Glazed Green Beans?
Speed is the obvious perk—8 minutes vs. 20+ on the stove—but the microwave’s secret weapon is steam control. Unlike boiling, which leaches flavor, microwaving green beans in a splash of water creates an enclosed humid environment. This cooks them evenly without sacrificing that satisfying snap. Cooking green beans in the microwave not only saves time but also preserves their vibrant color and nutrients. It’s an easy method that ensures perfectly tender green beans every time.
Reducing the glaze separately prevents sogginess. Microwaving balsamic and honey in 30-second bursts avoids scorching, giving us precise control over thickness. Want syrup-like cling? Done. Prefer a lighter drizzle? Easy. Experimenting with microwave techniques can also enhance dishes like an easy caprese salad, where a balsamic glaze adds a delightful touch.
Ready to gather your beans and balsamic? Let’s talk ingredients (including sneaky swaps for pantry emergencies).
Ingredients for Microwave Balsamic Glazed Green Beans
Grab these staples (or their trusty backups) to whip up this dish. Our core trio is green beans, balsamic vinegar, and sweetener—but we’ve got hacks for when the pantry rebels. For a quick and easy side dish, consider trying microwave garlic green beans. This simple recipe enhances the natural flavors of the green beans, making them a delicious complement to any meal.
Green Bean Alternatives (Fresh Vs. Frozen)
Fresh beans deliver that snap-factor we crave—look for firm, bright pods. Frozen work too! Just skip the thawing. Toss them straight into the microwave, but add 1 extra minute to cook time. Canned? They’ll taste like mush. Trust us, we’ve mourned that texture. For a quick and tasty alternative, microwave canned beans for a delicious side dish in minutes.
Balsamic Vinegar Substitutes
Out of balsamic? Mix 1 tbsp apple cider vinegar + 1 tsp honey. It’s not identical, but nails the sweet-tangy vibe. Red wine vinegar works too—just bump the sweetener by ½ tsp. White vinegar? Too harsh. Save it for pickling.
Sweetener Options
Honey caramelizes beautifully, but maple syrup or brown sugar work. For keto, try ½ tsp monk fruit + 1 tsp water. Avoid artificial sweeteners—they can turn bitter when zapped. My cousin learned that the hard way during her “sugar-free November.” If your brown sugar hardens, there’s a quick fix. A few seconds in the microwave can soften brown sugar just in time for your recipe.
Also See: Lazy Microwave Boxed Rice With Canned Peas
How to Make Glazed Green Beans in the Microwave
This isn’t just “dump and nuke.” We layer flavors while protecting that crunch. Follow these steps, and you’ll avoid the dreaded mush-zone. If you’re looking for an equally tasty and quick method, microwave veggie chips can achieve that perfect crunch with the right technique.
Step 1: Prep & Microwave Green Beans
Rinse 1.5 cups beans and trim ends. Place in a microwave-safe bowl with 2 tbsp water. Cover with a vented lid or plate. Microwave on high for 3 mins for fresh, 4 mins for frozen beans (even from dry). Drain immediately—linger, and they’ll steam into sogginess.
Step 2: Create the Balsamic Glaze
In a separate ramekin, mix 2 tbsp balsamic, 1 tbsp honey, 1 minced garlic clove, and ½ tsp butter. Microwave uncovered for 30 seconds. Stir. Repeat until it thickens to syrup (1-2 cycles). Watch closely—it goes from glossy to gluey fast! If you need to heat honey for your recipes, the microwave can be a quick solution. Simply place it in a microwave-safe container to heat it gently without compromising its flavor or texture.
Step 3: Coat & Finish in Microwave
Toss beans in the glaze. Microwave uncovered for 30 seconds to set the coating. This quick blast melds flavors without overcooking. Garnish with cracked pepper or sesame seeds. Boom—glazed without the stovetop slog.
Avoiding Soggy Beans: Microwave Timing Tips
Microwaves vary wildly. Start with 2.5 mins for fresh beans, then check every 30 seconds. They’re done when bendable but still snap when folded. For 600W models, add 1 minute. At 1200W? Subtract 45 seconds. Your beans, your rules. And remember, even when you microwave vegetables, it’s all about timing for the best texture.
Also See: Easy 90-second Banana Bread Recipe in a Flash!
What Do Balsamic Glazed Green Beans Taste Like?
Imagine biting into a green bean that’s crisp as autumn leaves, then hitting a wave of sweet-tart glaze with garlicky undertones. The butter rounds out the acidity, making it rich but not heavy. It’s like your favorite roasted version—but ready before the oven preheats, just like other quick microwave glazed green beans.
My friend Dave, a sworn veggie skeptic, once ate three servings and asked, “Wait, this is healthy?!” The tang disarms, the sweetness hooks, and the texture seals the deal.
Now that your taste buds are intrigued, let’s tackle keeping leftovers crisp (because yes, there might be leftovers… maybe).
How to Store &Amp; Reheat Microwave Glazed Green Beans
Leftover glazed green beans? We’ve all been there—eyes bigger than our appetite. Store them right, and they’ll stay crisp-tender for 3-4 days. Transfer cooled beans to an airtight glass container (plastic absorbs garlicky smells) and refrigerate. Skip the lid until they’re fully chilled to prevent condensation sogginess.
Reheating is a stealth mission against mush. For microwave revival: spread beans on a microwave-safe plate lined with a paper towel. Zap for 45 seconds, toss, then 15-second bursts until warm. The towel absorbs excess moisture, saving that glaze from becoming a sad soup. If you’re feeling fancy, reheat in a skillet over medium heat with 1 tsp oil—crispier edges guaranteed.
- Freezing? Not our favorite move—thawed beans lose their snap. If you must, freeze unglazed beans in a single layer first, then bag them. Reheat from frozen with 1 tbsp water, then add fresh glaze.
- Glaze too thick? Stir in ½ tsp water before reheating. It’ll loosen up without diluting flavor.
Pro tip: My neighbor once microwaved leftovers without the paper towel trick. Let’s just say her “green bean pudding” became a cautionary tale at our block party. Microwaving leftovers properly can actually help eliminate harmful germs and bacteria. Making sure to cover food while reheating is a simple way to keep meals safe and tasty.
Even perfectly stored beans can face microwave mishaps. Up next: dodging common blunders (like overcooking or glaze gone rogue). It’s important to remember that many foods are often microwaved incorrectly. For instance, some items can benefit from a little extra care to ensure they heat evenly and safely.
Now It’s Your Turn to Try!
We’ve covered everything from selecting crisp green beans to nailing that glossy balsamic finish in minutes. The microwave method gives you restaurant-quality glazed beans with minimal effort—no stovetop splatters or endless stirring required.
Why not whip up a batch tonight? Toss in some toasted almonds or a pinch of red pepper flakes for extra flair. We’d love to hear how your microwave balsamic beans turn out!