Melting chocolate in the microwave is faster and simpler than using a stovetop. It opens up a world of quick, delicious treats.
You can make way more than just basic dips or sauces with melted microwave chocolate. We’re talking full-blown desserts and snacks.
This article shares four fun and easy recipes using microwave-melted chocolate.
Jump To:
Crafting Beach-themed White Chocolate Bark in Your Microwave
We love making white chocolate bark because it’s like creating edible art in our kitchen. The microwave makes this process incredibly simple compared to tempering chocolate on the stovetop.
From our experience, white chocolate melts much faster than dark chocolate – usually in 30-second intervals at 50% power. We’ve learned the hard way that white chocolate can seize up quickly if overheated.
The beach theme comes alive when we add crushed graham crackers, dried coconut flakes, and mini pretzel pieces. We like to sprinkle some sea salt on top for that ocean breeze flavor.
What works best for us is melting 8 ounces of white chocolate chips in 30-second bursts, stirring between each interval. Once smooth, we spread it on parchment paper and add our beach-inspired toppings immediately.
One mistake we made early on was adding wet ingredients like fresh fruit. The moisture causes the chocolate to clump and become grainy. Stick to dry toppings for the best results.

Effortless Gourmet Chocolate-dipped Pretzels Via Microwave Melting
Chocolate-dipped pretzels are our go-to when we need a quick snack that looks fancy. The salty-sweet combination never fails to impress guests.
We prefer using thick pretzel rods because they hold up better during dipping. The key is getting the chocolate consistency just right – not too thick or it clumps, not too thin or it won’t coat properly.
From our trials, melting chocolate in 15-second intervals at 70% power gives us the smoothest texture. We stir gently after each interval to check the consistency.
What I found works best is dipping the pretzel about halfway, then letting excess chocolate drip back into the bowl. We place them on wax paper and add sprinkles or chopped nuts while the chocolate is still warm.
Our biggest discovery was using a deep narrow bowl for dipping. It uses less chocolate and makes coating much easier than a shallow dish.

Two-minute Microwave Chocolate Covered Strawberries for a Quick Treat
Chocolate-covered strawberries feel like luxury dessert magic, but they’re surprisingly simple with microwave melting. We can have restaurant-quality treats ready in just two minutes.
The secret lies in completely dry strawberries and properly melted chocolate. Any moisture on the berries will cause the chocolate to seize and become unusable.
We wash our strawberries first, then pat them completely dry with paper towels. Let them sit for 10-15 minutes to air dry before dipping. This step makes all the difference.
For the chocolate, we melt 4 ounces of semi-sweet chocolate chips in 20-second intervals at 60% power. The lower power prevents overheating and keeps the chocolate smooth and glossy.
From my own experience, holding the strawberry by its green top and dipping at a slight angle gives the best coverage. We place them on parchment paper and refrigerate for 15 minutes to set the chocolate firmly.
One mistake I made was trying to rush the cooling process. Room temperature chocolate takes about 30 minutes to set properly, but the fridge speeds this up significantly.

Also See: Quick & Easy Peach Cobbler in a Mug (Microwave-made)
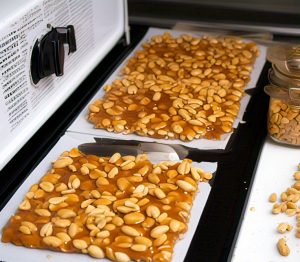
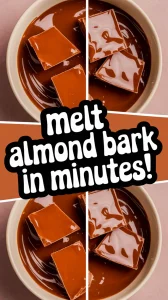
Mastering the Microwave Melt for Perfect Almond Bark Creations
Almond bark is one of our favorite microwave chocolate projects because it’s so forgiving compared to temperamental white chocolate. The coating chocolate melts evenly and holds its shape beautifully.
From my own experience, almond bark requires different timing than regular chocolate. We melt it in 45-second intervals at 60% power, which prevents the oils from separating.
What I found works best is breaking the almond bark into uniform pieces before microwaving. Larger chunks take longer to melt and can create hot spots that burn the chocolate.
One mistake I made early on was stirring too vigorously. Almond bark can develop air bubbles that create a cloudy finish. We use gentle folding motions instead of aggressive stirring.
The beauty of almond bark lies in its versatility. We’ve mixed in crushed cookies, dried fruit, and even popcorn for unique flavor combinations. It sets up firm at room temperature without needing refrigeration.
Pro Tips for Flawless Microwave Chocolate Melting Every Time
After years of microwave chocolate mishaps, we’ve learned some hard-earned tricks that save time and prevent waste. These techniques work whether you’re melting chips, bars, or coating chocolate.
Always use a microwave-safe glass or ceramic bowl, never plastic. Plastic can retain heat unevenly and cause scorching. We prefer glass measuring cups with spouts for easy pouring.
From my trials, the 50% power rule is crucial for success. Full power creates hot spots that burn the chocolate before the center melts. Lower power takes longer but gives us smooth, glossy results.
What I strongly suggest is the “thirds rule” for timing. Start with one-third of your estimated time, check and stir, then continue in shorter intervals. This prevents overheating disasters.
One mistake I made was adding liquid flavorings directly to melted chocolate. Water-based extracts cause seizing. We add oil-based flavorings or mix extracts with a tiny amount of coconut oil first.
Room temperature chocolate melts more evenly than cold chocolate straight from the fridge. We let our chocolate sit out for 10-15 minutes before microwaving for the best results.
The residual heat continues melting after microwaving stops. What looks slightly undermelted often becomes perfectly smooth after stirring and resting for 30 seconds.
Choosing the Right Chocolate for Your Microwave Recipes
Not all chocolate behaves the same way in the microwave. We’ve tested dozens of brands and types to find what works best for different projects.
Chocolate chips are engineered to hold their shape during baking, which means they need more time to melt completely. We prefer chopped chocolate bars for smoother melting in most recipes.
From our experience, higher quality chocolate with more cocoa butter melts more smoothly than budget brands. The extra fat content creates better texture and prevents seizing.
What I found works best is matching chocolate type to your final product. Semi-sweet chips work great for dipping because they set up firm. Milk chocolate gives a creamier texture but stays softer.
White chocolate is the trickiest to microwave because it contains no cocoa solids. It melts at lower temperatures and burns easily. We always use 30% power for white chocolate projects.
One discovery we made is that chocolate with added ingredients like nuts or caramel bits melts unevenly. The mix-ins create hot spots. We remove them before melting and add back afterward.
Coating chocolate or almond bark contains stabilizers that make microwave melting more foolproof. These are perfect for beginners who want consistent results without the finicky nature of pure chocolate.
Ready to Start Your Own Microwave Chocolate Adventure?
We’ve shown you four incredible ways to transform simple chocolate into gourmet treats using just your microwave. From elegant chocolate-dipped strawberries to crunchy pretzel delights, these recipes prove that impressive desserts don’t require fancy equipment or hours of prep time.Your microwave is waiting to become your new favorite dessert-making tool. Start with whichever recipe caught your eye most – maybe those beach-themed white chocolate bark creations for your next gathering, or keep it simple with two-minute chocolate-covered strawberries for tonight’s treat. Remember to use our melting tips for smooth, glossy results every single time.