You can make rich, creamy fudge in your microwave in under 10 minutes, no candy thermometer or double boiler needed.
It’s faster, simpler, and less messy than any stovetop method.
We’re sharing our four favorite microwave fudge recipes, from 3-ingredient peanut butter to classic chocolate.
Jump To:
Effortless 3-ingredient Peanut Butter Fudge
When we need a quick dessert fix, our 3-ingredient peanut butter fudge delivers every time. You only need peanut butter, powdered sugar, and butter. That’s it!
From our experience, this recipe works best with creamy natural peanut butter rather than the overly processed stuff. The oils in natural peanut butter help create that perfect fudgy texture we’re after.
We microwave the butter for 30 seconds first, then stir in the peanut butter until smooth. Add the powdered sugar gradually to avoid lumps. The whole process takes under 5 minutes.
One mistake we made early on was using crunchy peanut butter thinking it would add texture. It made the fudge grainy and harder to cut cleanly. Stick with creamy for the best results.

Quick 2-minute Peanut Butter Fudge With 4 Ingredients
Our 2-minute version adds vanilla extract as the fourth ingredient, and the difference is remarkable. That splash of vanilla elevates the entire flavor profile.
What we found works best is using a microwave-safe glass bowl rather than plastic. Glass heats more evenly and prevents any weird chemical tastes from plastic containers.
We heat everything in 30-second intervals, stirring between each burst. This prevents the mixture from overheating and becoming grainy. Total microwave time is usually around 90 seconds.
From our own experience, don’t skip the cooling time in the refrigerator. We’ve been tempted to cut into warm fudge, but it needs at least 2 hours to set properly for clean slices.

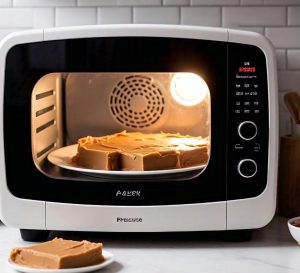
The Ultimate Classic Microwave Peanut Butter Fudge
This is our go-to recipe when we want bakery-quality fudge at home. It includes marshmallow cream which creates an incredibly smooth, creamy texture.
We strongly suggest investing in a good microwave-safe measuring cup with a pour spout. It makes transferring the hot mixture so much easier and safer.
The key timing we’ve discovered is heating the butter and peanut butter first for 60 seconds, then adding the marshmallow cream and heating for another 30-45 seconds. Over-microwaving makes the mixture too stiff.
One trick we learned is to line our pan with parchment paper, leaving overhang on the sides. This creates handles for easy removal and perfect square cuts every time.
What I found works best is letting the fudge come to room temperature before cutting. Cold fudge can crack, while slightly warm fudge cuts like butter.
Also See: Microwave Magic: Pre-cooked Sausage & Canned Corn
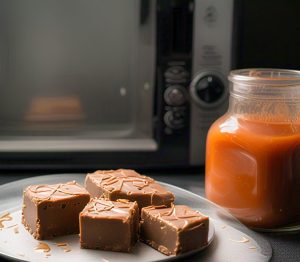
Simple and Rich Traditional Microwave Fudge
Our traditional microwave fudge is the perfect starting point if you want to master chocolate fudge without the fuss. This recipe uses chocolate chips, sweetened condensed milk, and butter for that classic rich flavor.
What we love about this version is how forgiving it is. Unlike stovetop methods that require precise temperature control, microwaving gives you more wiggle room with timing.
We start by microwaving the chocolate chips and butter together for 60 seconds, then stir until smooth. The sweetened condensed milk goes in next, followed by another 30-45 seconds in the microwave. The mixture should be glossy and completely smooth.
From our own experience, don’t rush the stirring process. We spent an extra minute whisking out any remaining chocolate chip lumps, and it made all the difference in the final texture.
One mistake we made early on was using a pan that was too large. The fudge spread thin and didn’t have that perfect thick, dense texture we wanted. An 8×8 inch pan works perfectly for most recipes.
Essential Tools for Perfect Microwave Fudge
Having the right equipment makes microwave fudge so much easier and more successful. We’ve learned this through plenty of trial and error.
First, invest in a large microwave-safe glass bowl. We prefer Pyrex because it heats evenly and has a pour spout on some models. Plastic bowls can warp from the heat and leave weird tastes in your fudge.
A good silicone spatula is non-negotiable. Metal spoons can scratch your bowl and don’t scrape the sides as effectively. We use a heat-resistant silicone spatula that can handle the hot mixture without melting.
Parchment paper is our secret weapon for easy removal. Line your pan with parchment, leaving overhang on two sides. This creates handles that let you lift the entire fudge block out for cutting.
We always keep an instant-read thermometer handy, even though it’s not strictly necessary. The mixture should reach about 225°F for proper setting. This helps us avoid overheating.
What I found works best is having a sharp knife specifically for cutting fudge. We wipe it clean between cuts to get those perfect, smooth edges everyone admires.
Creative Variations for Your Microwave Fudge
Once you’ve mastered the basics, we love experimenting with different flavors and mix-ins. The microwave method works beautifully with almost any variation you can imagine.
Our favorite white chocolate version uses white chocolate chips instead of regular chocolate. Add dried cranberries and chopped pistachios for a festive holiday treat that always impresses guests.
For coffee lovers, we stir in 1 tablespoon of instant espresso powder to any chocolate fudge recipe. The coffee intensifies the chocolate flavor without making it taste like coffee candy.
Swirl patterns are easier than they look. We drop spoonfuls of peanut butter or Nutella on top of the fudge mixture, then use a knife to create marble patterns. Don’t overmix or you’ll lose the distinct swirls.
What we found works really well is adding crushed cookies. Oreo pieces, graham crackers, or even crushed pretzels add great texture contrast to the smooth fudge base.
One mistake we made was adding too many mix-ins at once. Stick to 1 cup total of extras per batch, or the fudge won’t set properly and becomes crumbly when you try to cut it.
Ready to Make Your Own Microwave Fudge Magic?
We’ve shared our favorite microwave fudge recipes that transform simple ingredients into creamy, indulgent treats in just minutes. Each recipe delivers restaurant-quality results without the fuss of traditional candy-making methods. The best part? You probably already have most ingredients sitting in your pantry right now.
Start with our 3-ingredient peanut butter fudge if you’re new to microwave candy making. Once you’ve mastered the basics, experiment with our creative variations like adding crushed cookies or swirling in different nut butters. Your kitchen will smell amazing, and you’ll have sweet treats ready faster than a trip to the candy store!