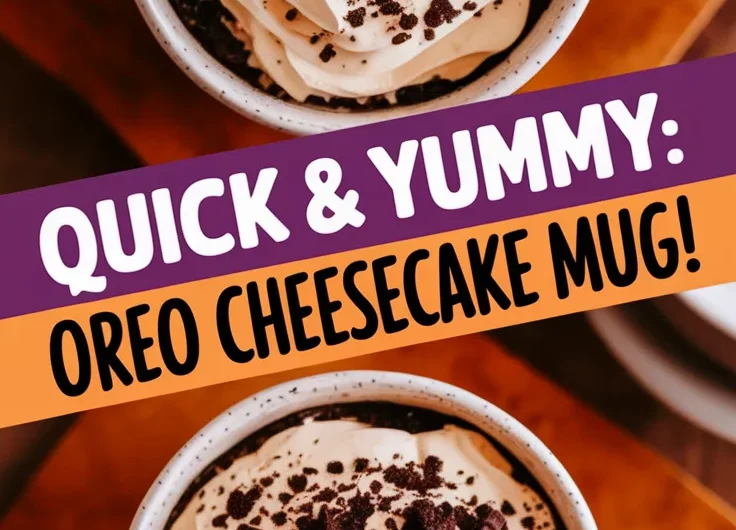
Craving a rich, creamy dessert but short on time? Our Microwave Oreo Cheesecake Mug is your golden ticket to indulgence in under 5 minutes—no fancy equipment needed.
This single-serving treat combines the iconic crunch of Oreos with velvety cheesecake—all cooked in your microwave. No oven, no patience required. Just pure, chocolaty bliss that’s ready before your next TikTok loads.
We’ll walk you through every step, from crushing cookies to nailing the perfect microwave settings. Get ready to transform your mug into a dessert masterpiece.
Jump To:
Microwave Oreo Cheesecake Mug
Course: DessertCuisine: American1
5
minutes1
minute300
kcal6
minutesWho needs a full cheesecake when you can have a luscious Oreo cheesecake made in a mug? This quick and easy microwave recipe combines cream cheese, crushed Oreos, and just a few other ingredients to create a delightful personal-sized dessert. Perfect for satisfying late-night cravings or whenever you need a little treat!
Ingredients
cookies crushed
cream cheese softened
powdered sugar
vanilla extract
milk
Oreo cookie (for topping
optional).
Directions
- In a microwave-safe mug, combine 2 crushed Oreo cookies and 2 tablespoons of softened cream cheese.
- Mix well until smooth.
- Add in 2 tablespoons of powdered sugar and 1 tablespoon of vanilla extract.
- Stir until all ingredients are fully combined.
- Pour in 1 tablespoon of milk and mix until the batter is creamy.
- Microwave the mug on high for about 30 seconds.
- Keep an eye on it to prevent overflow.
- After 30 seconds, check the cheesecake; it should be set but slightly jiggly in the center.
- If needed, microwave for an additional 10-15 seconds.
- Allow the mug to cool for a minute.
- Top with an extra Oreo cookie if desired and enjoy your delicious microwave Oreo cheesecake!.
Notes
- Feel free to adjust the sweetness by adding more or less powdered sugar according to your taste. If you want a richer flavor, you can mix in some chocolate chips or swap out the Oreos for other favorite cookies. This mug cheesecake is best enjoyed fresh, but you can store any leftovers in the refrigerator for later!
What is a Microwave Oreo Cheesecake Mug?
Imagine a mini Oreo cheesecake baked right in your favorite mug—ready in 90 seconds. We’re talking crushed Oreo crust, creamy cheesecake filling, and melty chocolate chunks, all microwaved to gooey perfection. No springform pans, no water baths, just your trusty mug and a microwave.
My dad George once forgot my birthday cake until the last minute. Cue this mug recipe—saved the day with a dessert that had everyone asking for seconds. Now it’s our family’s “emergency celebration” hack.
What Does Microwave Oreo Cheesecake Mug Taste Like?
Close your eyes and picture this: cool, tangy cream cheese swirled with powdered sugar, layered over buttery Oreo crumbs, and warmed just enough to soften the edges. The top stays luxuriously creamy, while the base gets that signature cookie “crunch” we all crave.
It’s richer than pudding but lighter than traditional cheesecake—like a cross between a mousse and a New York slice. The Oreos soften slightly but retain enough texture to avoid mushiness. Trust us, it’s the spoon-clinking-against-the-mug kind of good. If you crave a quick dessert, a microwave banana pudding mug is a delicious option. It combines the creaminess of pudding with the convenience of a mug, making it easy to satisfy your sweet tooth in just minutes.
Ready to make your taste buds dance? Let’s gather your ingredients—spoiler alert, you probably already have most in your pantry. With just a little creativity, you can whip up delicious meals that rival your favorite takeout right in the microwave. Discovering quick microwave recipes not only saves time but also brings the flavors of takeout into your home kitchen.
Ingredients for Microwave Oreo Cheesecake Mug
Let’s raid your kitchen! You’ll need 4 Oreo cookies (the classic ones work best), 2 tablespoons cream cheese (softened), and 1 tablespoon powdered sugar. Optional but life-changing: a splash of vanilla extract or chocolate chips for gooey pockets. For a delightful twist, try making a cookie butter dip in the microwave for an easy sweet blend that pairs perfectly with your favorite snacks. This quick recipe will elevate your dessert game and satisfy those sweet cravings.
Essential Ingredients &Amp; Substitutes
No cream cheese? Swap in Greek yogurt for a tangier twist (your waistline might thank you). For gluten-free folks, gluten-free chocolate sandwich cookies work beautifully. Vegan? Use dairy-free cream cheese and Oreo dupes—we won’t tell.
Pro tip: Powdered sugar blends smoother than granulated. If you’re in a pinch, blend 1 teaspoon granulated sugar with ½ teaspoon cornstarch. It’s science, baby! Just make sure not to microwave granulated sugar directly when making your Microwave Oreo Cheesecake Mug.
Also See: Quick & Easy 2-minute Chocolate-covered Strawberries
How to Make Microwave Oreo Cheesecake Mug
This is where the magic happens. Grab your favorite microwave-safe mug—I use my chunky “Coffee Boss” one because it holds drama better than my ex. Just pop it in the microwave for a warm drink, and watch as the heat transforms your beverage. It’s amazing how quickly a simple mug can turn a cold drink into a comforting warm one.
Step 1: Crush Oreos for the Base
Separate 2 Oreos (twist like you mean it!). Keep the cream filling—it’s flavor gold. Crush cookies into crumbs using a rolling pin… or channel frustration by whacking them in a Ziploc bag. Mix crumbs with ½ teaspoon melted butter (or coconut oil) for a crust that sticks together—perfect for our Microwave Oreo Cheesecake Mug.
Step 2: Mix Cream Cheese and Sugar
In a separate bowl, mash softened cream cheese with powdered sugar until smooth. Room temp is key here—30 seconds in the microwave softens stubborn bricks. Stir in vanilla if using. Lumps? Keep mixing. We’re aiming for silkier than your favorite pajamas.
Step 3: Layer Ingredients in the Mug
Press Oreo crumbs firmly into the mug bottom. Spoon cream cheese mixture over it. Crumble remaining 2 Oreos on top—leave some chunks for texture. Swirl gently with a toothpick if you’re fancy. For a delightful dessert experience, consider trying an Oreo mug cake recipe that combines the rich flavors of Oreos with the convenience of microwave cooking. This quick treat is perfect for satisfying your sweet cravings in just a few minutes.
Step 4: Microwave Settings and Timing
Nuke at 70% power for 60 seconds. Why not full power? High heat rubberizes dairy—trust me, I’ve made hockey pucks. If your microwave lacks power settings, do 30 seconds, wait 10, then 20 more. Peek for a slightly set center.
Step 5: Cooling and Topping Tips
Let it rest 2 minutes—this prevents molten lava mouth. Top with whipped cream, a drizzle of melted chocolate, or a cheeky Oreo wedge. Serve with a spoon and zero shame. For a delightful treat, consider trying a microwave lava cake recipe that is both quick and satisfying.
Also See: Microwave Chicken Wings Recipe – 5 Variations, Tips, Tools, FAQs & More

Common Mistakes and How to Avoid Them
Over-microwaving: Your mug cake should jiggle slightly—it firms as it cools. Nuking too long turns it into a chewy stress ball. To create the perfect microwave mug cake recipe, pay attention to the cooking time and texture. Proper timing ensures you enjoy a fluffy and delicious treat right from your mug.
Cold cream cheese: Lumpy filling is sad filling. Soften it by leaving it out for 30 minutes or microwaving 5-10 seconds. Microwaving cream cheese for a short time can make it smooth and spreadable, enhancing your recipes. It’s a simple tip that can elevate everything from bagels to cheesecakes.
Skipping the butter: Dry crumbs won’t hold. Even a smidge of fat binds the base. No butter? Use the Oreo cream fillings you saved earlier!
Got your dessert? Great. Let’s chat about keeping leftovers (if any) tasting fresh.
How to Store Microwave Oreo Cheesecake Mug
Let’s be real—leftovers are unlikely. But if you’ve miraculously saved half, here’s how to keep it fresh. My sister once hid hers in the fridge… until I found it 3 days later. Spoiler: It still tasted divine.
Refrigerate for up to 2 days: Cover the mug tightly with plastic wrap or transfer to an airtight container. The cheesecake firms up when chilled—perfect for those who prefer a denser texture. Want it warm? Microwave 10-15 seconds to revive that just-made gooeyness.
Freeze for 1 month: Scoop the cheesecake into a freezer-safe bag, press flat, and seal. Thaw overnight in the fridge or zap at 30% power for 60 seconds. Note: The Oreo base loses some crunch, but the cream cheese stays velvety.
Pro tip: Press cling film directly onto the surface before refrigerating. This prevents a “skin” from forming—because nobody wants leathery cheesecake. Also, dairy-based desserts shouldn’t sit at room temp longer than 2 hours. Safety first, indulgence second. After all, if you’re looking for a quick and delicious dessert, a microwave raspberry cheesecake mug is a perfect option for satisfying your sweet tooth with minimal effort.
Up next: How to turn this classic into mint-chocolate madness or peanut butter paradise. Let’s remix your mug! One delightful option is a microwave chocolate peanut butter mug, which combines rich flavors in a quick, easy treat. It’s perfect for satisfying sweet cravings without the hassle of a full baking process.
Now It’s Your Turn to Indulge!
With just a few Oreos, cream cheese, and a microwave, you’ve got a decadent single-serving dessert ready in minutes. The creamy texture with that signature cookie crunch makes this mug cheesecake dangerously addictive.
Experiment with different toppings like whipped cream, chocolate drizzle, or fresh berries to make it your own. Once you master this recipe, you’ll never crave late-night sweets without a solution again!