Craving a vibrant spring dessert but allergic to oven drama? We’ve got you. This microwave passionfruit tart skips hours of baking and delivers tropical sunshine in under 15 minutes.
Imagine a buttery crust hugging a tangy-sweet passionfruit curd—all made with your trusty microwave. No soggy bottoms, no fancy tools, just pure zesty joy.
We’ll walk through microwave-safe crust hacks, balancing tartness with sweetness, and spring-ready garnishes that’ll make your taste buds bloom.

Jump To:
Delightful Passionfruit Tart – A Spring Microwave Sensation!
Course: DessertCuisine: Tropical6
15
minutes10
minutes250
kcal35
minutesWhile traditional tarts can be time-consuming and require an oven, this microwave passionfruit tart is a game-changer. With simple ingredients and a fast preparation method, you can indulge in a delicious, tangy dessert that showcases the vibrant flavors of passionfruit. Perfect for spring gatherings or a refreshing treat on a warm day.
Ingredients
of graham cracker crumbs
of melted butter
of passionfruit pulp fresh or canned
of sweetened condensed milk
eggs
of vanilla extract
of lemon juice
fruit optional for topping
cream . optional for serving
Directions
- In a mixing bowl, combine graham cracker crumbs with melted butter until well mixed.
- Press the mixture into the bottom of a microwave-safe tart dish and set aside.
- In another bowl, whisk together passionfruit pulp, sweetened condensed milk, eggs, vanilla extract, and lemon juice until smooth.
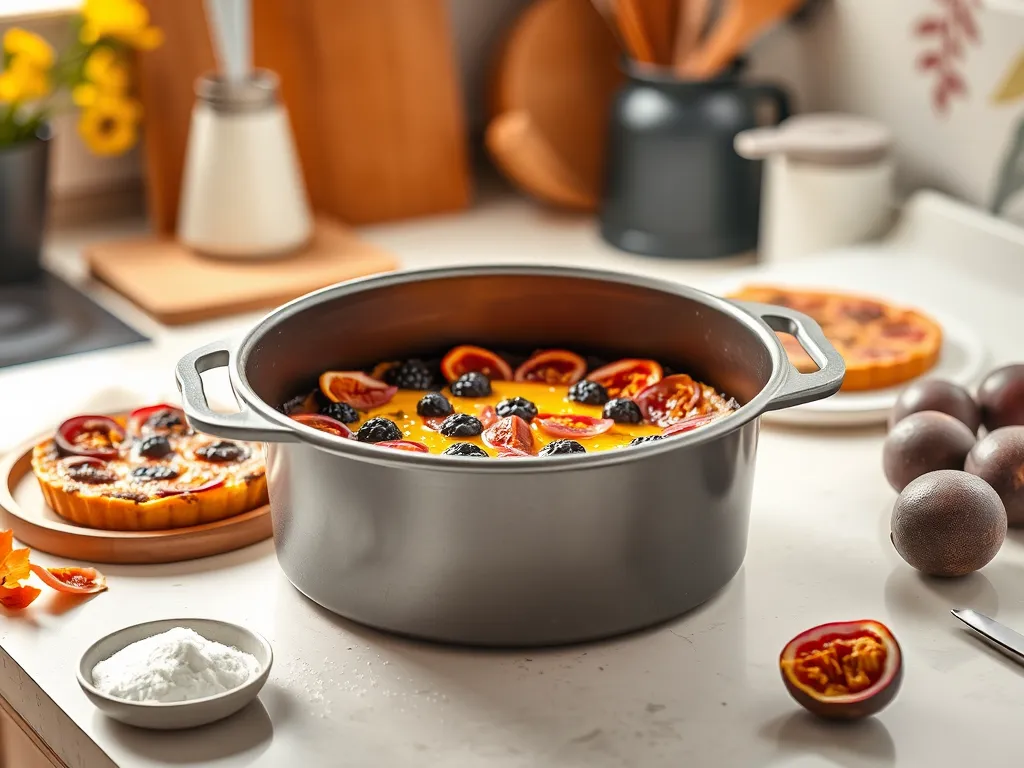
- Pour the passionfruit mixture over the crust in the tart dish.
- Microwave on high for 8-10 minutes, checking the tart every minute after the 6-minute mark, until the filling is set.
- Allow the tart to cool for at least 10 minutes before refrigerating to chill completely..
Notes
- For best results, refrigerate the tart for a couple of hours after cooling to enhance the flavors. You can adjust the sweetness by adding more or less sweetened condensed milk based on your preference. Top with fresh fruit or a dollop of whipped cream for an extra touch of deliciousness!
What is a Passionfruit Tart?
A passionfruit tart is a sunny collision of buttery crust and tropical curd made from the pulp of passionfruit. Unlike oven-baked versions, ours leans on the microwave for speed—think golden edges and a custardy center without babysitting a hot oven. My mom Linda used to spend hours perfecting her tarts, but this method lets us swap her “patience is a virtue” mantra for instant gratification.
Spring Microwave Set Essentials
You’ll need three tools to nail this recipe: a 6-inch microwave-safe springform pan (non-negotiable for clean slices!), a glass mixing bowl, and silicone spatulas. Skip metal utensils—they’re the arch-nemesis of microwaves. Pro tip: Sarah and Timmy once “helped” me bake using a regular cereal bowl. Let’s just say…we ate passionfruit soup that night. Springform pans prevent crust catastrophes.
What Does a Microwave Passionfruit Tart Taste Like?
Imagine biting into a cloud that’s been zapped with a citrus lightning bolt. The filling is tangy and floral, like a tropical storm in your mouth, while the crust offers a mellow, cookie-like crunch. Timmy claims it’s “sour candy fancy,” while Sarah insists it’s “sunshine with a spoon.” Both are weirdly accurate.
Balancing Sweetness & Tartness
Passionfruit pulp is naturally tart (pH 2.5-3.5!), so we tame it with condensed milk or honey. For every ½ cup of pulp, add ¼ cup sweetener—adjust based on your crew’s preferences. Linda likes hers puckeringly sharp, but the kids lobby for extra honey. We compromise by swirling in mango puree for a fruity buffer. Pro move: taste the filling pre-microwave. If it makes your eyes water, add sweetness in 1-tbsp increments. This delightful mix brings a touch of tropical vibes, perfect for evoking a refreshing beach mood. Imagine enjoying a creamy mango lassi made with that same blend, right from your microwave, and savoring the flavors of summer.
Ready to raid your pantry? Let’s unpack the ingredients that turn microwave magic into edible confetti. Just like those enticing popcorn bags, some pantry staples might have hidden dangers when heated. It’s vital to know the scary truth behind butter flavoring and other additives in microwavable treats.
Ingredients for Passionfruit Tart (Spring Microwave Set)
Our microwave-friendly tart needs just six core ingredients: passionfruit pulp, sweetened condensed milk, eggs, butter, crushed biscuits (digestives or graham crackers), and vanilla. Spring’s the season for experimentation though—we’ll show you smart swaps next.
Passionfruit Pulp Alternatives & Substitutes
No fresh passionfruit? No panic. Use 100% passionfruit concentrate (3 tbsp mixed with 2 tbsp water = ½ cup pulp) or blend mango puree with lemon juice (2:1 ratio). Last Easter, my friend subbed in key lime juice and called it a “tropical margarita tart.” Weirdly worked. For a fun twist, try using a spicy margarita mix with a homemade microwave citrus syrup to elevate your cocktails. This simple syrup enhances the flavor and adds a zesty kick that complements the sweetness of the fruit.
Microwave-safe Crust Options
Skip oven-baked pastry—we use crushed biscuits + melted butter for a no-fuss base. Graham crackers (200g) give classic sweetness, while digestives (180g) add a malty kick. For gluten-free, pulverize rolled oats (160g) with coconut oil (3 tbsp). Pro tip: always press crumbs firmly—loose layers turn into edible quicksand. You can even microwave the biscuits to soften them further for better binding.
Also See: Trader Joe’s Microwave Frozen Pizza Revived: Quick & Easy!
Essential Microwave Tools for Perfect Tarts
Your weapon of choice? A 6-inch microwave-safe springform pan (we like Pyrex Glass 700W-rated). Avoid metal clamps—they spark like miniature lightning shows. My cousin once microwaved a regular ceramic dish with metallic accents on the rim and spent 20 minutes chiseling out crust shards. Springform’s removable base = clean slices without the archaeology.
Springform Vs. Regular Microwave-safe Dishes
Springform pans let you lift the tart vertically, preserving those Instagram-worthy layers. Regular dishes work in a pinch, but you’ll need to line the bottom with parchment paper and flip the tart (risky business!). For 800W+ microwaves, reduce cooking time by 15% to prevent rubbery textures.
Also See: The Fake Bake Challenge: 5 Microwave Desserts
How to Make Passionfruit Tart in the Microwave
Let’s turn that ingredient list into springtime bliss. We’ll build this tart in four foolproof steps, microwaving smarter—not harder. Microwaving isn’t just about convenience; it can significantly alter the properties of certain ingredients. For instance, heating milk in the microwave changes its texture and flavor, often enhancing the overall dish.
Step 1: Crafting the Microwave-safe Crust
- Crush 200g biscuits into sand-like crumbs (use a bag + rolling pin therapy session)
- Mix with 80g melted butter until it clumps like wet beach sand
- Press into springform pan, freeze 5 minutes (microwave hates soggy foundations)
Step 2: Quick-prep Passionfruit Filling
- Whisk 3 eggs + ½ cup sweetened condensed milk until smooth
- Stir in ½ cup passionfruit pulp + 1 tsp vanilla (expect tropical aroma fireworks)
- Microwave mixture in 20-second bursts, stirring between, until thickened (≈90 seconds total)
Step 3: Layering & Microwaving Techniques
Pour filling over chilled crust. Microwave at 70% power for 3-4 minutes—low-and-slow prevents scrambled egg surprises. Watch for edges setting while the center stays jiggly (like spring break Jell-O). If your microwave lacks power settings, cook in 45-second intervals with 15-second rests. For a quick meal, mastering microwave egg recipes can be a game-changer, providing delicious options in no time. Consider trying scrambled or poached eggs as a simple and satisfying addition.
Step 4: Spring Set Assembly & Cooling
Let tart cool 10 minutes before unclamping the pan. Chill 1 hour minimum—this isn’t a drill! Skipping this step once led to what my kids dubbed “passionfruit lava flow.” Delicious? Yes. Photogenic? Not so much.
Now that we’ve nailed the basics, let’s troubleshoot common microwave mishaps before they crash your tart party. Many people don’t realize how easily microwaves can malfunction or even explode when used improperly. Being aware of what not to put in the microwave can save you from potential disasters.
Common Microwave Mistakes & How to Fix Them
We’ve all been there—pulling a tart from the microwave only to find a sad, soggy mess. Microwave baking has its quirks, but a few tweaks can save your dessert (and your pride). Some foods thrive in the microwave rather than the oven, enhancing their flavor and texture. Let’s tackle two biggies.
Avoiding Soggy Crusts in Microwave Baking
Soggy crusts happen when moisture from the filling seeps into the base. Our fix? Pre-freeze your crust for 5 minutes before adding filling—it creates a moisture barrier. If you’re extra paranoid (like me after the Great Tart Flood of 2022), brush the crust with melted white chocolate first. It’s a tasty shield against sogginess.
Another culprit: overcrowding. Microwaves steam food rapidly, so keep tart layers thin. If your springform pan is deeper than 2 inches, split the filling into two batches. Trust me, doubling the recipe once led to a crust that resembled a wet sponge. Not our finest brunch moment. It’s just one of those things you get wrong when using microwaves.
Adjusting Power Levels for Even Cooking
Microwaves zapping at 100% power? That’s like sprinting through a dessert marathon. Drop to 70% power for gentler, even heating. At 800W, this means 3-4 minutes instead of 2 minutes at full blast. No adjustable settings? Cook in 45-second bursts with 15-second rests to let heat distribute.
Hotspots are real. Rotate your tart 180° halfway through cooking if your microwave lacks a turntable. My neighbor’s “lopsided lemon disaster” taught us this—now we’re rotation evangelists.
How to Store Microwave-prepared Tarts
Spring tarts are all about freshness—that zing shouldn’t fade. Proper storage keeps your passionfruit bright and crust crisp(ish). Here’s our battle plan.
Preserving Freshness in Spring Sets
Cool your tart completely before storing—trapped steam turns crusts limp. Use an airtight container lined with paper towels to absorb excess moisture. For springform pans with removable bases, wrap the whole setup in cling film. It’s like a tiny tart greenhouse.
Fridge life? 2-3 days max. Beyond that, the crust softens into “chewy cookie” territory. Freezing works too: slice, wrap in parchment, and stash in freezer bags for up to a month. Thaw at room temp for 20 minutes—microwave defrosting risks curd separation. Learned that during a midnight snack emergency. If you’re in a hurry, defrosting frozen pizza dough in the microwave is an option, but care is needed to avoid uneven thawing.
Now that your tart is safely stored, let’s spring into fun variations that’ll make your taste buds do cartwheels…
Now It’s Your Turn to Whip Up This Zesty Treat!
With just a microwave and a few spring-ready ingredients, you’re all set to create this vibrant passionfruit tart. The balance of tropical tang and buttery crust makes it a showstopper for any occasion.
Tag us on social media if you try it—we’d love to see your microwave masterpieces! For extra flair, top with fresh berries or a dollop of whipped cream right before serving.